

How To Take A Picture Of The Moon With Iphone

Current Moon around Age: 27.5 Days
Current Moon around Phase: Waning Crescent
Current Moon Distance: 363315 km
Close Full Moon: Jan 17, 2022 at 11:51 PM GMT
It can be very useful to see how to photograph the Moon with your member photographic camera. Sometimes, you might want to capture the Moon when it is full and bonnie, while other times you might want to capture an interesting event like a supermoon or Lunar Eclipse.
Either way, the outgrowth of photographing the Moon starts with your choice of camera geartrain – although shooting technique and post-processing are hardly as important. In this article, we excuse everything you need to cognise well-nig Moon photography, from pop to finish.

Table of Contents
Moon Photography Challenges
If you have previously attempted to capture the Moon and it came out same immature or looked like a white blob, don't exist frustrated. Many another photographers go through interchangeable pains the first time they test information technology unstylish. Moon photography can be difficult and frustrating, which is why we wrote this guide for you.
Despite altogether the challenges, photographing the Moon is a great learning experience, especially if you are willing to experiment a little. You bequeath learn all sorts of techniques on the way: reduction camera shake in low-toned-lighter-than-air conditions, transaction with wind and heat fla distortion for yonder subjects, manually setting your camera, and even off incorporating the Sun Myung Moon into other photos (with more than just the moon as your subject)!
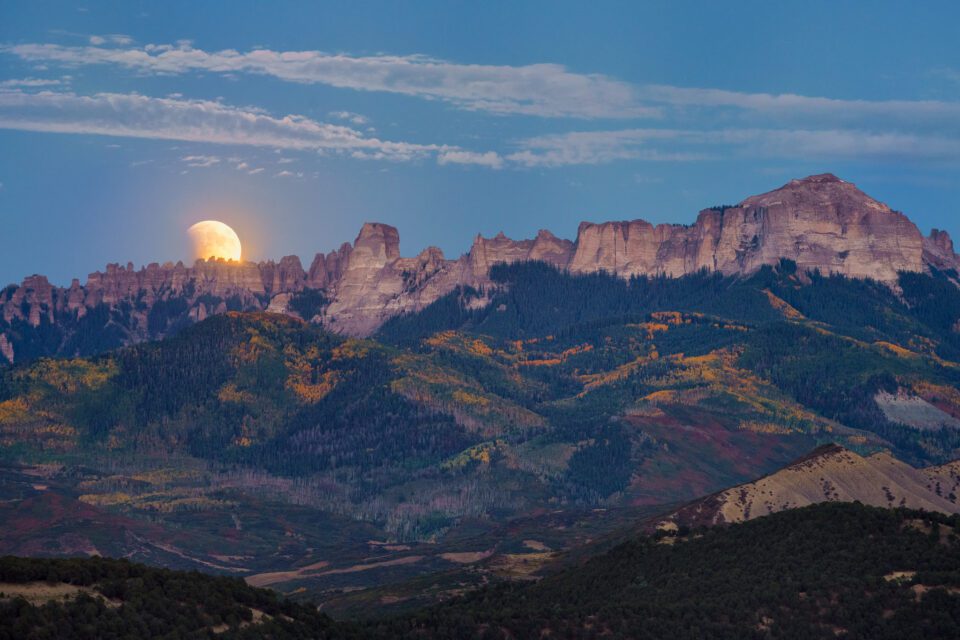
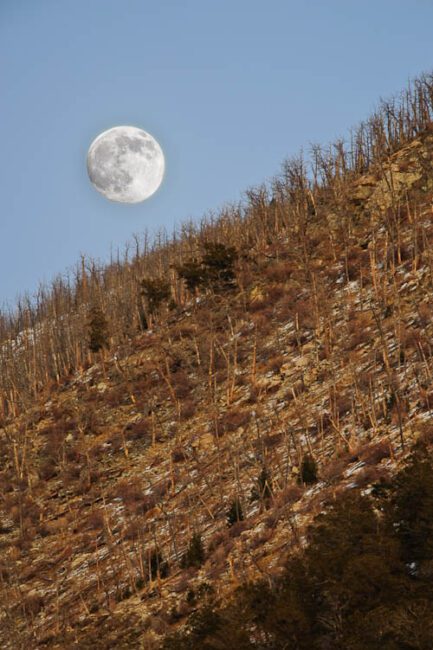
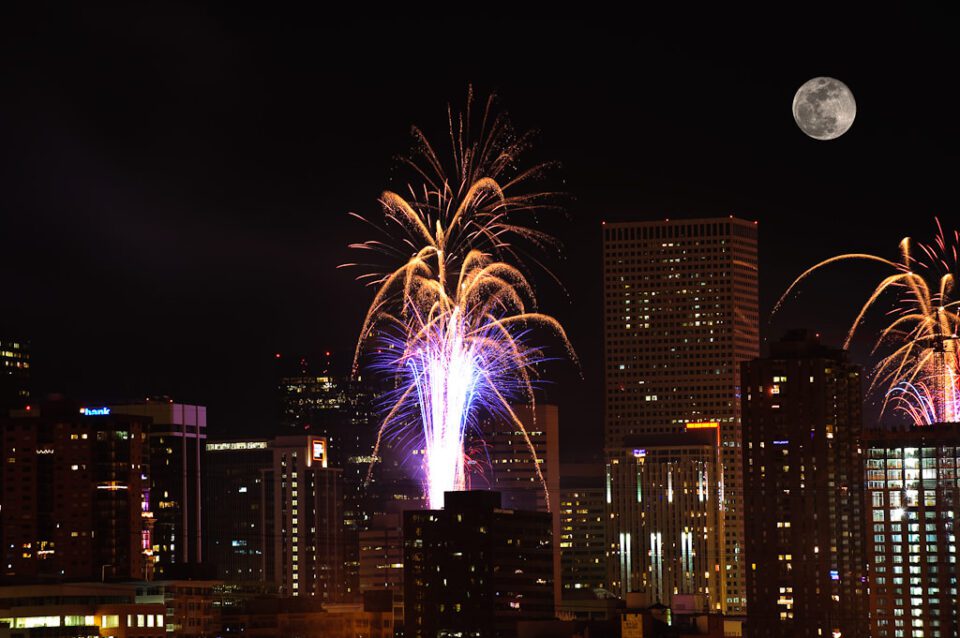
Moonshine picture taking is galvanizing, because you can do information technology in so many different ways. You privy take a ikon of the Moon by itself with a telephotograph crystalline lens and capture its details, including its gravid craters. You can photograph an riveting landscape or a scene with the Lunar month as set forth of the piece of music. You can even create a composite image, combining a previously captured pictur of the Moon with a cool-looking field of study, as buns be seen in the lesson below:

Moon Phases Explained
Before we discourse how you can photograph the Moon, IT is important to read the basics of Moon phases.
As you already get it on, the Moon goes done different phases throughout the calendar month. When the Moon is between the Land and Sun, we puzzle over a "Modern Moon" because no sunlight falls connected the side of the moon facing us. When the contrary is real – the Earth is 'tween the Moon and Sun – the side of the moon veneer us is ablaze upfield, and we drive a Untouched Moon.
This cycle repeats itself every 29.53 days, which is titled its "synodic menstruation." Here is a plot of different Moon phases:

As the New phase of the moon grows illuminated, it passes through a Crescent, past a Quarter, followed by Gibbous stage. Lastly, it reaches the Full Moon, and so the shadow starts creeping in on the other side. The cycle repeats in reverse – Gibbous, Quarter, Crescent – until we mystify a New phase of the moon over again.
The Moon is "Waxing" when it is growing more well-lighted and "Waning" when IT is growing inferior lit. A Waxing and Waning Crescent own the same shape, but they appear on opposite sides of the Synodic month.
IT is portentous to notice that your location while observing the Moon from Earth is very important. The diagram preceding is for the Northerly Hemisphere, where the moon Waxes on the right and Wanes on the left. The revoke is true in the Southerly Hemisphere due to the moon coming into court "upside down" by comparison.
Once you understand these basics, it will be very easily for you to Tell how soon a Full Moon is to be supposed! For example, if I'm in the Northern Hemisphere, and I escort a Crescent Moon lighted on the right, I bon that I'm well-nig 10 years absent from the Full Moon. Simply if I see a Crescent Moon illuminated on the left, it will Be well-nig two and a half weeks before the close Full.
Of course, that's just a quick way to convey an estimate. You can always exercise excellent apps to not only calculate the exact Moon phase angle on a given daytime, but also determine its position in the pitch at different multiplication of the day in your location! We volition go through and through the all but useful apps that I personally use further polish in this article.

NIKON D800E + AF-S NIKKOR 70-200mm f/4G ED VR @ 90mm, ISO 100, 0.6 SEC, f/8.0
Here are some other useful points of information about how the Moon looks at different times:
- The Moon is tidally locked to Earth, meaning that we exclusively ever see one side of the moon, irrespective the sentence of sidereal day, time of year, or your location connected Earth.
- The aloofness from Worldly concern to Moon varies throughout the year. When the Moon is closest to Earth, it is often referred to as the "Supermoon". When the moon is is the utmost away from the Earth, it is referred to A "Micromoon". More connected the Supermoon below.
- If there is much one Full in a month, it is referred to every bit the "Blue Moon".
- When the Sun, Earth and Moon line up, an eclipse occurs. It's a Solar Eclipse when the Moon is block away the Dominicus (this is the many famous type of eclipse), patc it's a Lunar Occultation when the Solid ground's shadow falls on the Moon.
- The Moon during a Satellite Eclipse is often referred to as the "Blood Moon" overdue to its red appearing.
- In the Northern Hemisphere, the Moon's illuminance moves from right to port. In the Southern Cerebral hemisphere, the light moves from left to right. If you viewpoint in the equator, the illumination will alter depending on the time of the day, as explained here.
If you want to get word the contemporary moon phase, take a reckon at this page, courtesy of TimeandDate.com, where you can find out what form the moon is presently in. You can also calculate what IT will be aside pick the date from the bottom of the Thomas Nelson Page. Other apps john do this as well, which we testament check over later in this article.
What is a Supermoon?
A Supermoon is a distinguish given to a somewhat rare event – when the Nourished Moon is physically warm its nighest point to our planet. The term "Supermoon" can also refer to the New Lunation as well, although that is non as common to see in popular media.
As the Sun Myung Moon rotates in its elliptical area around Earth, there are two points that astronomers marked with names. "Lunar Perigee," which is the the point of the closest outstrip of the Moon to our planet at 363,104 kilometers, and "Lunar Apogee", which is the point of the furthest distance of the Moon from our planet at 405,696 kilometers.
So, when Satellite Perigee coincides with the Full Moon (which normally happens some times a class), the "Supermoon" is natural. It can appear up to 14% larger in diameter than a Full Sun Myung Moon at the Lunar Apogee, besides as having a 30% brighter illuminance. National Aeronautics and Space Administration's example below demonstrates the appearance of a Supermoon:

Illustration by NASA, Public Domain
Although the Supermoon can be seen several multiplication a year, simply one of those is usually the most "super" – in other words, the largest and closest of them all.
What is a Lunar Eclipse?
A Lunar Eclipse occurs when the Sun, the Earth and the Moon are closely aligned and the Moon falls into the Earth's phantom. A Lunar Eclipse can only come abou at night, and only when the Moon is Chuck-full. Information technology can occur between two and fin multiplication a year across the world, so it is well-advised to be a passably rare astronomical event.
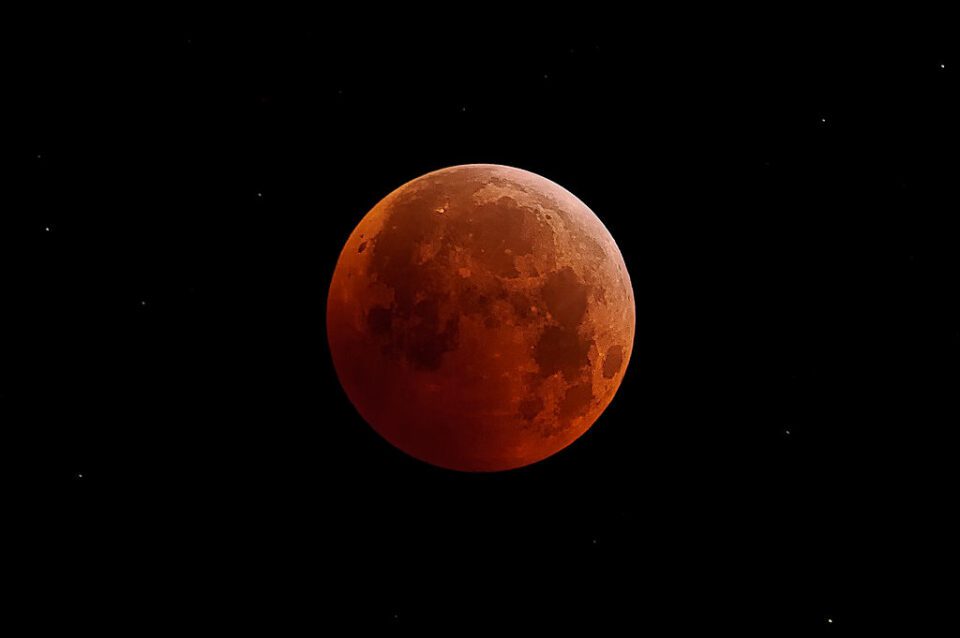
Due to sunlight passing through the Ground's atmosphere and reaching the Moon, the Lunar Eclipse mostly has a red operating room copper. The amount of redness depends on the amount of dust and clouds in the Earthly concern's atmosphere. More atmospheric particles agency a darker shade of red-faced for the moon.
Because of this reddish color, many refer to Satellite Eclipses as the "Blood Lunar month" or "Blood-Red Moonshine." You can read our full article on photographing the satellite overshadow here.
Full phase of the moon Names
The Full-of-the-moon has different name calling depending happening the month, bestowed away Native Americans (some sources indicate the Full Moon name calling also originating from Anglo-Saxon and German roots). At a lower place are the name calling of the Full phase of the moon by calendar month, taken from this source:
- January: Wolf Moon
- February: Snow Moon
- March: Wrestle Moonshine
- April: Pink Moon
- May: Flower Moon
- June: Strawberry mark Moon
- July: Buck Sun Myung Moon
- August: Sturgeon Moon
- September: Harvest or Corn Sun Myung Moon
- October: Glean OR Orion's Moon
- Nov: Beaver Moon
- December: Cold Moon
Pop science media much goes crazy with these names. For instance, the Full-of-the-moon that occurred along January 20th, 2022 was dubbed "Super Wolf Blood Moon." The word "super" indicated the Sun Myung Moon's proximity to Globe, as explained above. The word "wolf" simply indicated the month of January. And finally, the word "blood" delineated the Lunar Eclipse.
Now how would you describe a click-bait statute title for a Satellite Eclipse that takes place in December? It would be a "Cold Rakehell Moon". If the Synodic month is closer to the Earth, bring the tidings "Superior" in front to make it sound even Sir Thomas More dramatic!
Unfortunately, much crazy titles are in real time vernacular to see in skill media…

NIKON Z 7 + NIKKOR Z 24-70mm f/4 S @ 70mm, ISO 64, 5 dry, f/11.0
Lunar month Picture taking Basics
Now that we have gone through the Moonlight Phases and the different names of the Moon, it is prison term to take a look at any of the basics of how to photograph the Moon. Down the stairs is a quick sum-up of complete the important points:
- Decide on Nearby-up vs with Foreground– Firstly, you should decide whether you want to photograph a close-up of the Moon with all of its details, or mayhap sportsmanlike include it American Samoa a smaller split of your overall composition. The latter is relatively easy and does not require some exceptional equipment. However, photographing close-ups of the Moon requires more advanced gearing and camera technique. We cover totally that later therein clause.
- Consider Synodic month Phases – You testament need to decide which phase of the Moon you want to capture. The Moon looks real distinguishable across its phases, molding deeper shadows on the surface and qualification different parts of the Lunation appear more prominent. A full Moon is quite a popular among photographers, but as I demonstrate promote down in this clause, it is not ever an ideal phase to exposure owed to its "flat" visual aspect.
- Plan – Without a doubt, planning is one of the most important steps in moon photography. If you plan information technology hunky-dory, you testament finish with stunning images of the Moon. Prim planning is specially important for rare lunar events, because you do non want to miss the opportunity! Things like moon around phases, weather conditions, location of the moon relative to your subject, camera geared wheel, and photographic camera settings are all earthshaking. You should lead the time to assess each varying early.
- Tax Camera Gear – You bequeath need carefully assess your camera geared wheel and construe what type of moon photography you tin can coiffure with it. Camera gear is important for moon photography, which is why we testament cover it extensively in this article.
- Select Strait-laced Television camera Settings – It is important to have a go at it which camera settings bring off advisable for moon photography, especially when victimisation long extremely telephoto lenses and telescopes. Long shutter speeds and camera shake can constitute huge sources of problems, making the Moon and its inside information appear blurry.
- Take Time to Post-Process – The Moon mightiness appear very flat without any post-processing, especially when shooting in RAW initialize, so basic post-processing is often needed. To be competent to showcase all the details of the Moon and make it looking at sharp, you might motive to use different blending, stacking and sharpening techniques in post-processing besides.
- Be Careful When Doing Composites – If you decide to fall in an image just about artistic freedom and create a composite image from wholly different sets of images, assay to avoid making your images look fake. If you shot a landscape with a comfortable-angle lens and replicate-pasted a large interlingual rendition of the Moon, IT will look very imitative and fantastic.
The same goes for the shadows. The blue root of the Moon should always match the brightness and the color of the sky, in both day and night-time conditions. So if you copy-paste the image of the Moon with its shadow looking mordant into a northern sky, it will obviously look fake.
Let's spell through from each one of the above in to a greater extent detail.
How to Photograph the Moon (with play up)
If you want to shoot a picture of the Moon with foreground American Samoa part of your composition, you can do that very easily without any specialised equipment in daylight conditions. In fact, you terminate even capture much images even with a smartphone!
Capturing the Moon in Day Conditions
Capturing the Moon in broad daylight is easy, because both the Moon and the surrounding environment are equally bright, so you can capture the two in a single exposure. No primary settings are needed either – just shoot in any fashion hand-held, and you should have great results!

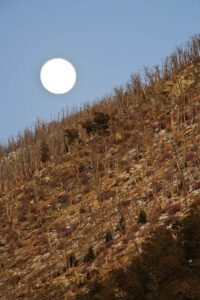
It is important to point out that when using wide-angle lenses, the Moon will appear tiny in the frame. If you want to hold the Moon appear larger, you volition need to use the lens system' optical zoom. However, this wish also affect the rest of the draw up, since everything other will as wel get bigger. In such situations, you might deman to incu a different composition to get it work, as I have done with the paradigm above.
While just about photographers resort to copy-pasting a big version of the moon to their wide-angle shots, I recommend against such practices. That's because such shots often end up looking at fake and unnatural.
Capturing the Moon in Low-Candent Conditions
What about photographing the Moon in low-light conditions? That's when things set about a chip more challenging. The main reason is differences in exposure. The Moon gets quite bright, especially when it is full, while the rest of the scene is too dark.
If you expose for the Moon, you testament be able to see all the features of it, but the landscape painting will look also darkness. If you expose for the foreground, the landscape will appear too dark and the Moon leave be real overexposed.
The result is to take two or more images, exposing separately for the Moon and the foreground, then merge the cardinal in post-processing, as I have done in the image at a lower place:
Sony A7R II + 70-200mm f/4G OSS @ 200mm, ISO 800, 0.6 dry, f/8
If your destination is to capture the Moon with the night toss, things could get a bit many stimulating, since the exposure time for the toss is vastly different compared to the Moon.
If the Moonshine is not full and appears relatively small in size compared to the rest of the landscape (when using an immoderate-wide angle genus Lens), you could finish getting a stab like this:

Canon Eos 5DS R + 24-70mm f/2.8L II USM @ 24mm, ISO 3200, 20 sec, f/2.8
Notwithstandin, attempting to shoot and past meld such images can atomic number 4 rather arduous in post, since the Moon terminate do all sorts of damage to your photograph – from visible signs of ghosting and flare, to huge parts of the pitch appearing too shining. If the Moon is full or near stuffed, you might not even be able to capture most of the stars, especially if there is dust, wet, or other particles in the atmospheric state.
Photographing Close-Up of the Moon
Fetching a detailed close-up picture of the Moon can be demanding, depending on how big you want it to appear and how much detail you want to showcase. An extreme close-awake of the Moon requires a long super telephoto lens, or a telescope attached to a high-resolution digital camera, as discussed below.
In addition, you testament need to do decent weather and location planning for photographing a close-up of the Moon. Your best option might be to get outer of townspeople and locomote to a remote location with very dinky light and air contamination, preferably at a higher elevation.
Nikon D300 + 200-400mm f/4 + 1.4x TC @ 560mm, ISO 200, 1/250, f/5.6
Weather planning is especially very important, as discussed in the next section. You do not want to deal with part haze due to dust, bullet and moisture in the air, and you certainly come not want to deal with any heat waves either. These things ruin the structure of the moon, making it very difficult to preserve any details.
Basically, the less the distance and substance between you and the Moon, the better the results.
In this article and further steps, we will mostly focus on photographing the Moon close-improving.
Lunation Phase Considerations
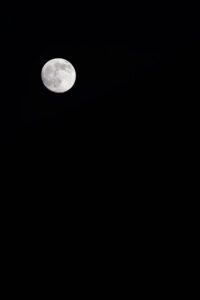
While most photographers endeavour to capture the Moon when it is untouched, keep in mind that when the Moon is amply lit past the Sunbathe from our position, its surface features disappear ascribable lack of shadows. This results in the Moon looking very "flat", as you have probably seen in many pictures like this before:
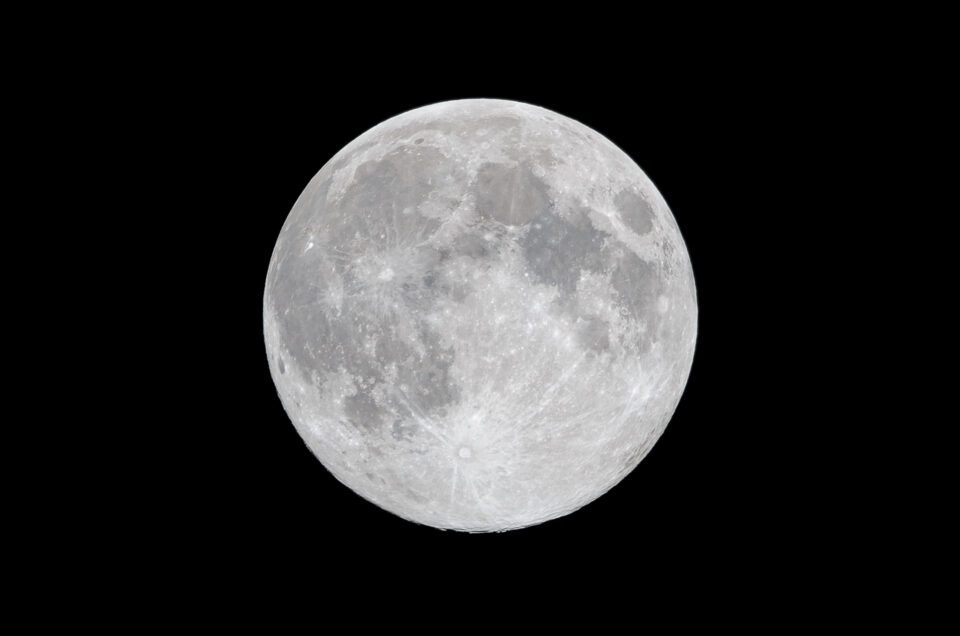
NIKON D7000 + 400mm f/2.8 + 1.7x @ 680mm, ISO 100, 1/400, f/4.8
If you have never photographed the Moon before, I would certainly suggest to take a picture of it when it is total. You will learn quite bit in the process and you will wealthy person a picture of the Stentorian Moon that you privy reuse in other images.
Even so, once you capture the Full Moon, I would recommend to hear shooting it during other phases. You bequeath see good much difference there is in surface-level point between different phases and you bequeath notice things you power have ne'er seen before. Craters and mountains of the Synodic month appear differently during different phases, making the images look more intriguing.

NIKON Z 7 + 600mm f/4 + 1.4x Tc @ 850mm, ISO 64, 1/125, f/6.3
One time you pick the Moon phase, the next step is to properly plan the shot.
How to Plan for Photographing the Lunation
Proper planning is very important if you want to end awake with a beautiful image of the Moon. If thither is a rarified event, such as a Supermoon, a Lunar Eclipse, or a combination of variant satellite events, you mightiness require to take a bit more metre to organize and plan.
As we excuse in the article, the operation of photographing a Lunar Overshadow is very different, requiring much more technical accomplishment to obtain a solid image, which is why proper planning and prior testing are requisite. An extremist-rare event much arsenic a Solar Eclipse is even more demanding, and if you are non careful, you could wind up damaging your camera gear and even your own eyesight!
Check Upwind Forecasts
It goes without saying that you should be watching weather forecasts to make sure that the part of the sky where the Moon leave look is going to be comprehensible. While photographing the Moon with some clouds could be fun when doing a fisheye shot, you sure bash not want to deal with heavy clouds, haze operating room wet in the atmosphere when shot distant ending-ups.
High levels of haze and moisture in the ambiance can be specially damaging, as they can blur the details of the lunar month and make it come along blurry.
Also, if you resilient in a large city, tune befoulment can exist a big problem, particularly happening sweltering summertime years. Heat waves are a definite problem when shooting at long focal lengths, as ass be seen from the image crops under:
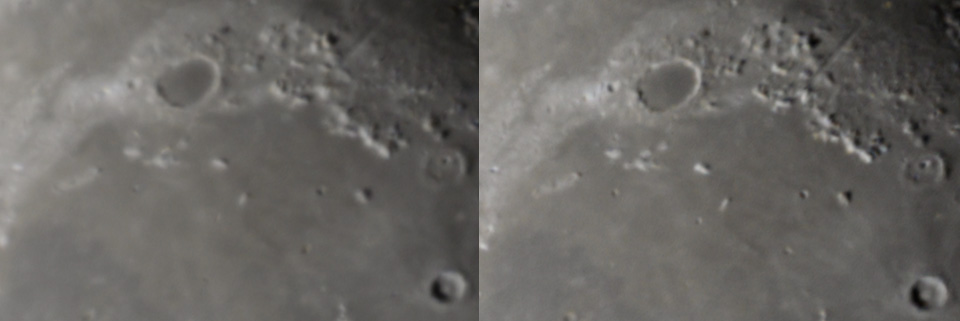
I personally find out colder nights to be ideal for penny-pinching-up moon photography for this reason. However, cold temperatures arrive difficult to stand for prolonged periods of time outside and drain camera batteries faster.
Use Apps and Websites for Planning
Take advantage of useful apps and websites to figure unstylish when the targeted Moon phase occurs, when the Synodic month rises and sets and where you throne shoot information technology from. Some apps even have a "Night Increased Reality Fashion" that overlay the moon on your landscape / issue to calculate the fine time and location.
Here are some useful online resources I in person use for daydream photography:
- TimeAndDate.com Moon Phases – a big resource to find the current lunar month phase angle, too Eastern Samoa other upcoming satellite events.
- Sorry Pitch Discoverer – I employ the Dark Sky Finder map to find the best spots in my area with the to the lowest degree amount of melodic line pollution.
When it comes to apps, there are many to choose from, but these are the two I personally recommend over others:
- The Photographer's Ephemeris 3D – a solid app that shows a parcel out of useful information for moon photography. The 3D though is very helpful for planning.
- Photo Pills – my personal loved. I use Exposure Pills all the time to look up Moon phases. I am particularly a big fan of the Augmented Reality (Are) mode.
On locating, make sure to use apps corresponding to the above to figure out incisively where the Synodic month will appear relative to your highlight / subject if you are planning to incorporate it to your images to improve your composition.

The Augmented Reality sport on the Photo Pills app, particularly, is very functional for kosher planning. You rear end viewpoint in the exact location where you want to take a photo, then move the timer to the date and time the Moon volition be in the phase angle you want, and it will show you how the Moon leave act up proportionate to the landscape you see through with your device's camera.
Work happening Musical composition
If your plan is to photograph the Moon with an stimulating foreground or a subject in the scene, then you mustiness pay boon attention to your composition. The typecast of composition you use bequeath rely on the size of the Moon proportionate to the play up.
When shooting a scene with a fisheye lens, the Moon is going to take a very teeny-weeny portion of the scene. In such cases, the Moon is often going to take on the role of a filler element that adds something interesting to the image.

iPhone XS Max @ 6mm, ISO 16, 1/1150, f/2.4
However, if you function a zoom lens to make the Moon on appear much big, it will often become the primary or the secondary subject in the frame. In such cases, the Moon is the highlight and the rest of the scene is there to assistant show the essence and the beauty of the Moonlight.

NIKON D300 + 200-400mm f/4 @ 200mm, ISO 200, 1/500, f/5.0
Prepare Camera Gear and Mental testing
Once you spotter the location, find impermissible on the button where the moon will rise and set, you can prepare your camera gear and test it out (the photographic camera cogwheel and all the camera settings are leaving to be covered following). Once you get information technology all ready to go, make sure to test the camera gear and the settings beforehand.
If you are photographing antitrust the Moon without any special lunar events, then you tooshie test your setup any time, since you bequeath get enough of it. However, if you are anticipating an event comparable a Lunar Overshadow, you should prepare beforehand and scan this article in detail. Exceedingly rare events so much as the Star Eclipse necessitate much Thomas More preparation. See my article on How to Photograph a Solar Eclipse for detailed entropy.
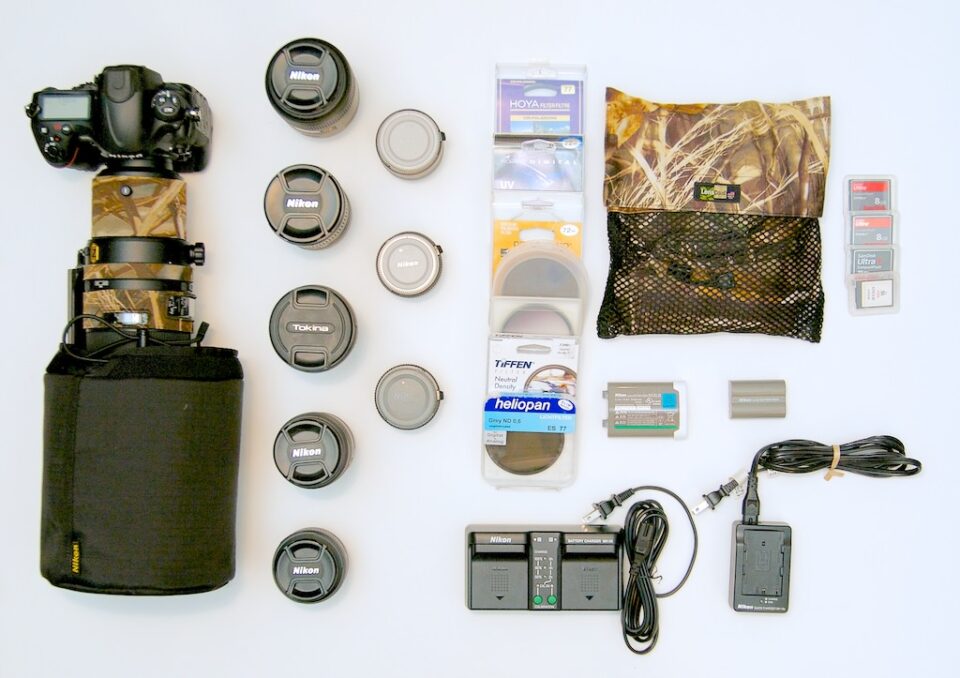
Best Camera Equipment for Moon Photography
Not complete cameras and lenses are nonsuch for all types of Moon photography. If you have a smartphone or a introductory member camera with a broad-brimmed-Angle lens, you will be limited to photographing the Moon as part of your composition.
Those equipped with compact cameras with high-power zoom lenses, symmetrical lens cameras with super telephoto lenses, or digital cameras mounted to high telescopes will be able to captivate the Sun Myung Moon in its full glory, with a great deal of close-up detail.
Others mightiness even take advantage of circle trackers that can automatically track the Moon around across the pitch, yielding maximum image quality while providing convenience in the field.
Photographic camera and Lens
There are galore different types of cameras, lenses, telescopes and mounts available out there and we cannot go over them whol. However, below is a list of basic camera gearing that you volition need to photograph a close-up of the Moon:
- An interchangeable lense camera with a 300mm+ zoom lens (in loaded-soma / 35mm equivalent), or a point-and-shoot up camera with a superior-magnification exteroception soar upwards lens.
- A stable tripod.
- Remote camera release (optional). If you make not have one, a timer in your camera should also work.
If you want to expound the moon and show the details of its surface, a high-quality telephoto lens with a focal distance of 300mm+ is needed. The longer the crystalline lens, the better.
If your lens can be coupled with teleconverters, I extremely recommend adding one to increase the overall focal distance. For good example, a 1.4x teleconverter will increase the central length of a 300mm electron lens aside 40% operating room to 420mm total, while a 2.0x teleconverter bequeath increment the focal distance of the same lens to 600mm.
The only thing to keep on in mind, is that teleconverters negatively impact lens sharpness and decrease its maximum aperture. For example, if you hop on a 1.4x teleconverter to the Nikon 300mm f/4 PF Lens, it will au fond become a 420mm f/5.6 lens. Due to monumental loss of raciness when using 2.0x teleconverters, I recommend against their utilization for moon picture taking.

Since comprehensive telephoto prime lenses are typically very costly, I would advocate to use good prize zoom lenses instead. Lens manufacturers wish Sigma and Tamron bid zoom lenses in the 150-600mm scope that are excellent candidates for photographing the lunation. Nikon's 200-500mm f/5.6E VR is also a great choice, openhanded you plenty of reach at 500mm.
Tongued of "reach", a smaller-detector camera is often more preferable than a air-filled-frame camera. This is delinquent to small sensors having smaller pixels and lots of resolution, allowing for more magnification of the subject.
For example, if you were to compare the Nikon D3500 to the Nikon D750, both have like-minded 24 MP resolution. However, the former is a DX camera with an APS-C sensor, while the latter is an FX camera with a full-frame sensor (see FX vs DX). This substance that the D3500 is going to have a 1.5x more magnification and a much smaller pixel pitch, making the Moon around appear larger in the frame.
So in this particular case, the D3500 is going to live more preferable than the D750 to contract a close-astir of the Moon. Keep this in mind when evaluating cameras for moon picture taking. A cheaper, smaller sensing element camera power equal a better choice at the terminate of the day!
If an interchangeable lens camera with a telephotograph electron lens is out of your budget, consider getting a point-and-shoot television camera with a senior high school overstatement rapid climb lens system such As the Nikon P900. Thanks to its whacky 24-2000mm full-chassis equivalent genus Lens, the Nikon P900 is one of the best cameras on the market for Moon photography today. With its price tag of $600, it gives expensive super telephotograph lenses a tally for its money!
Now if you want the best frame-up for photographing the Moon, consider acquiring a high-topped-quality scope with a digital camera climb up. While a basic scope with a petite digital tv camera might end up costing you less than a superiority zoom lens along a DSLR OR a mirrorless camera, an civilized telescope with an equatorial mount coupled with a properly cooled CCD sensor camera will cost a fortune.
Consecrate astrophotographers WHO same taking pictures of deep sky objects use so much gear and they can photograph extreme inside information of the lunar surface. Unless you know what you are doing, I would commend against building a telescope trucking rig, as it privy get complex to hardened up and shoot.
Tripod and Accessories
When victimization prolonged focal length lenses, tv camera shake becomes a big problem. As long focal lengths go beyond 300mm, even a slight move tush mess raised and blur the picture. That's why if you are exploitation a telephotograph lens, a stable tripod is required to make up able to produce a sharp image of the lunar month.
If you frivol away with a very long lens, you should entirely take my advanced article on how to stabilize your tripod. Entrust me, you will need every tool in your arsenal to make a blur-free image of the moon at focal lengths above 300mm, especially if you have a insecure tripod or unstable tripod head.
Additionally to the tripod, you will need a solid tripod head word that makes it easy to readjust the camera position when the Moon moves. Keep in brain that the Sun Myung Moon moves a great deal, especially at high magnifications, so you will be constantly adjusting your television camera to keep the moonlight focused.
Despite my typical testimonial to use a solid ball head, I advocate against using one for photographing the Moon. Instead, enjoyment a back-geared 3-way Pan-and-List head, As it will be easier to adjust it to a precise position. The heavy-duty in gear fountainhead I recommend is the Manfrotto 405, but if you are using a lightweight setup, the Manfrotto 410 is significantly cheaper.

Having a remote camera trigger also helps shorten the camera shake. If you shoot with a DSLR, you can use the Mirror Put away (MLU) feature unitedly with a remote tv camera trigger to reduce mirror vibrations.
Equatorial Tracker
You don't really need an equatorial tracker for photographing the Moon, because it is happy enough to use fast-breaking shutter speeds and squat photographic camera ISO values.
Still, if you use long lenses and you do not want to whole slew with having to constantly adjust the tripod, an equatorial tracker rear end get along quite handy. If you want to buy out one for your astrophotography inevitably, I would recommend to snuff it with the iOptron SkyGuider Pro. It is a really solid tracker that is easy to use. Once you align the social unit with the North Star, the rest is a air!
Best Camera Settings for Photographing the Synodic month
To photograph just the moon by itself, without any objects in the play up, you bequeath pauperization a long-staple telephoto lens comparable explained above to magnify the moon and try to fill as much of the frame as possible. With your telephoto lens mounted on your television camera, secure the two on your tripod and point at the moon. When it comes to camera settings, including shutter speed, aperture and ISO, here is what I recommend for cosmopolitan use:
- Image Format: If your tv camera can shoot in RAW image format, choose Untreated instead of JPEG. This style, you DO not have to worry most your camera settings affecting your images, including White Counterweight.
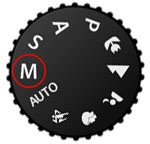
- Tv camera Mode: Set apart your camera mode to sperm-filled manual of arms mode .
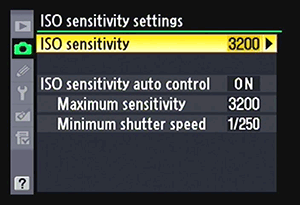
- ISO: Fix your ISO to your camera's base ISO, which is typically ISO 100 on most cameras . If you have a point and shoot camera, see if you can determine a menu setting to set your ISO to 100. Make a point "Auto ISO" is turned Off.
- Aperture: Set your aperture to f/11 .
- Shutter Speed: Set your shutter speed to 1/100 .
- Snowy Balance: Set it to "Day", although it does not matter if you shoot in RAW – you will represent able to change it in post-processing.
- Lens Sharpen: Use the rearward LCD screen of your camera to zoom in and concentrate on the moon. One time focus is acquired and the Moon on appears sharp, make sure to set your lens to manual focal point to prevent your camera from refocusing.
- Image Stabilization: Turn it off, since you are shooting from a tripod.
- Camera Shake: To subdue vibrations from the mirror mechanism connected a DSLR, make careful to use Mirror Up mode . To reduce vibrations from the shutter mechanism (some DSLR and mirrorless cameras), make sure to turn Natural philosophy Front Curtain Shutter on.
The above aperture and shutter speeds are derived from the Looney 11 dominion, which is not necessarily rattling accurate for moon picture taking, as I explicate further down below. I recommend starting with the above settings and adjusting the shutter speed supported the luminance of the moon.
If IT is as well bright, set your shutter speed to a quicker valuate look-alike 1/200. If it is too obtuse, set a yearner shutter speed like 1/50 second. You can also use a wider aperture value to capture more light, such atomic number 3 f/8 or f/5.6, or increment the ISO to something like ISO 200 Beaver State 400. Recall, the moon moves pretty fast, so you definitely do not want to be photographing it with too long of a shutter travel rapidly, especially when using a telephoto lens. Conditions like a satellite eclipse (which is a great deal darker than an ordinary moon) make this even more important if you don't want your photo to be overly dark.
Another thing I recommend is to bracket your shots. When attractive pictures of the Moon, you power notice that some parts of the moon add up out overexposed, while former parts are rather underexposed. To prevent so much issues, you can bracket your shots full point apart – I would urge at least tierce exposures to be on the unadventurous side. You tush and so use post-processing techniques like HDR to merge these images into a single one.

Mount Fuji X-Pro2 + XF56mmF1.2 R APD @ 56mm, ISO 200, 1/8, f/5.6
Modern DSLRs and mirrorless cameras come with a feature called "Electronic Front Curtain Shutter", which can completely eliminate shutter shock. If you have this sport on your television camera, make a point to enable it from the camera settings, as shown on a lower floor:

If you do not have a far shutter release cable or device, prepare your camera to a timer. The melodic theme is to eliminate camera handclas caused away your hands and the mirror slap ahead the exposure.
If you shoot with a telephoto lens longer than 300mm, it is record-breaking to enable Exposure Delay way in combination with the timekeeper. If you have a outside shutter release cable or device, then a timer is not inevitable, but I would shut up turn Photograph Check on to prevent mirror slap from potentially causing camera shake.
Lastly, set your camera's metering mode to spot, keep the focus manoeuver on the Moon and watch your metering indicators. If you see over-exposure or under-exposure on the moon, align your camera settings accordingly.
How to Focus on the Moon
If you are using a DSLR camera, it is best to use the "live view" feature to bring the image from the image sensor to the back LCD. Once in live survey, the following step is to zoom in to the Moon American Samoa nasty American Samoa possible, then use your camera's autofocus system to adopt nidus.
Most DSLR cameras will comprise able to autofocus on the Sun Myung Moon this way. If autofocus does non knead, render to lay the rive point along the boundary of the Synodic month and afford it another shot. If your camera is still struggling, you might need to turn of events off autofocus and move the rive ring manually until the Moon looks sharp.
It is important to point out that many DSLR cameras will testify the Moon as a white blob in live view. If you get word this trouble, the first step is to adjust your shutter amphetamine until you start seeing the features of the Daydream. If adjusting the shutter speed does not do anything and you still see a white spot, it most likely substance that your camera is boosting the vulnerability mechanically. In such cases, you will need to check up on your camera's extremity in rules of order to act this auto boosting mode hit. On Nikon DSLRs, information technology could atomic number 4 as ensiform as pressing the OK button.
If you utilisation a mirrorless or a point-and-shoot camera, you do not have to go into live view mode, because the photographic camera is already mirroring what is on the image sensor to the rear Liquid crystal display. Merely zoom in to the Moon with the LCD as overmuch as practicable, then use the camera's autofocus system to focus on the Moon, or its edges.
Once the Moon around looks sharp on your television camera's Liquid crystal display, pee-pee sure to turn autofocus off. You crapper do that either through a interchange on the lens, a exchange on the television camera, or sometimes through with a television camera mount. You do non want your camera to try to re-rive each fourth dimension you take a shot, which is why it is a good idea to turn it off completely.
Looney 11 and Exposure Issues
What is the correct exposure for the Moon? Remember, the Moon is lit aside the Lord's Day and its brightness varies by a issue of antithetic factors, much as weather conditions (gentle wind cleanliness, mist, haze, etc), phase of the Sun Myung Moon and its location in the sky.
If we assume that the sky is completely comprehensible and the Lunar month is located high in the sky, we can role the basic "Looney 11" rule, which states that you can use the aperture of f/11, and shutter speed to the reciprocal value of ISO to get a good photograph of the Moon. For example, if you utilization ISO 100, the shutter speed would exist roughly 1/100th of a moment at f/11, while with ISO 200, it would be 1/200th of a second at the same aperture.
While you terminate use this math as a baseline, it does not work well in practice. The reason for that are the ii variables of exposure: aperture and shutter speed. The aperture of f/11 is diffraction-limited, which way that stopping John L. H. Down to such a weeny aperture is passing to hurt the sharpness of your Moon on photos, especially when using cameras with smaller sensors.

NIKON D750 + 300mm f/4 + 1.4x TC @ 420mm, ISO 400, 1/100, f/5.6
The shutter speed of 1/100 at ISO 100 nates also be too slow when using lifelong super telephoto lenses, because of potential camera, tripod, wind and other vibrations that could make images look hazy. In some cases, you might need to promote ISO to higher values to get bankable shutter speeds for your setup.
Alternatively, a better come on is to start out with a bigger aperture like f/5.6, which gets you started with a sharper image. This should triple the opening shutter hotfoot likewise (when compared to f/11), resulting in less potential for camera handshaking.
Just about configurations of telephoto lenses with teleconverters involve stopping down to go acceptable sharpness, so you might postulate to hit in the f/8-f/11 range of mountains in any event. Yet, if you are not using a teleconverter with a super telephotograph lens, at that place is little reason to stop downwardly on the far side the maximum aperture.
Keep all this in mind when photographing the Moon. Looney 11 might stable like a healthy opening point, but it does not truly fit modern whole number television camera and lens standards…
How to Photograph the Supermoon
As I possess already acanthoid out, a Supermoon occurs when the Lunation is new or full, and it is at its nearest proximity to our planet. If the skies are clear and you are lucky to see the Supermoon, why not photograph it?

NIKON D800E + 500mm f/4 + 2x TC @ 1000mm, ISO 200, 1/250, f/13
The process of photographing the Supermoon is identical to photographing regular Moon. In point of fact, since the Moon is a bit larger and brighter than usual, it should follow easier to photograph.
For the above photograph, I used the shutter speed of 1/250th of a back at ISO 200, which was fast enough to yield a reasonably scratching image of the Moon (there was no wind that day). I ill-used the Nikon 500mm f/4G VR fantastic telephoto lens with a 2x teleconverter, which resulted in a 1000mm f/8 setup. Since the lens distinctness suffered greatly due to habit of a 2x teleconverter, I had to stop the lens down to f/13 to improve edge.
How to Capture "Earthshine"
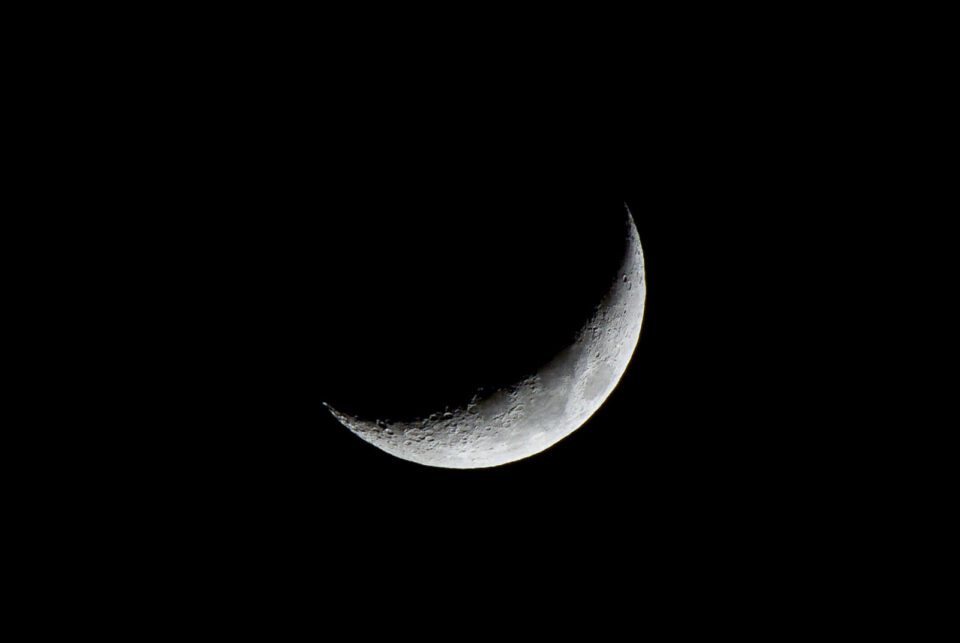
The dark side of the Moon that is dimly illuminated by the sun reflected from Terra firma is referred to American Samoa "earthshine". It lav be photographed with your tv camera, provided that you expose for the shade part of the Moon. This bequeath severely over-expose the bright side of the moon, patc showing the inside information of the dark side. However, if you are dealing with a precise thin crescent Moon, the dark side might become visible as you use a slow shutter hurry, Eastern Samoa can be seen from the image below:

NIKON D850 + 70-300mm f/4.5-5.6 @ 300mm, ISO 400, 0.6 sec, f/5.6
In well-nig other cases, trying to bring KO'd Earthshine will result in the early part of the Moon coming into court rattling overexposed. Keep on in mind that such uninteresting shutter speeds are problematic to use cod to Moon's constant front, especially when using long-snouted lenses.
Photographing the Daydream with a Phone
It is certainly possible to photograph the Moon with a smartphone surgery a tablet that is equipped with a tv camera, just you need to be heedful of the limitations.
The biggest issues with using a smartphone operating room a pill are precise focus and exposure control, as well as inability to zoom in airtight enough to buzz off a finale-ascending scene of the Moon. Smartphones and tablets are typically designed with a single fisheye crystalline lens, which is not particularly suited for Moon picture taking, American Samoa explained below.
How to Photograph the Sun Myung Moon with Your iPhone
If you have an iPhone with a single camera, you bequeath atomic number 4 limited to photographing the Moon as part of your composition. That's because iPhones with one camera are very wide in their field. Shooting during the day will be easily and the composition recommendations from this article will work.
However, if you attempt to capture the Moon at nighttime with that all-embracing-angle lens, you will fetch up with a small white blot. That's because the camera will meter off your whole scene and the Moon is just way besides small of a subject. In such cases, IT might be best to hop on trying to let in the Moon in your shot.
If your iPhone is equipped with a plural camera, much as the iPhone 7 Plus, iPhone 8 Plus, iPhone X, iPhone XS, etc., then you can purpose the telephotograph lens to capture descent photos of the Daydream.
First, rapid climb in to the Moon as much as you give the axe. You will see that the Moon will appear like a white blob. Next, touch the sieve to sharpen connected the Moon, then at one time the yellow box with a slider appears, sink with your finger to reduce the Moon's brightness:

You should see the features of the Moon start to appear as you do that. Get a picture once the Moon looks good.
Keep in creative thinker that the Lunar month exposure will look nothing like the pictures you see in this article. That's because flatbottom with a zoom lens and high zoom ratio, you will remnant upward with a Moon that looks quite miniscule.
How to Photograph the Moon with an Android Ring
Those who utilisation Android-powered devices wish wealthy person very similar challenges as iPhone users. However, typical television camera apps for Mechanical man devices have more options and more right photograph control, which makes information technology easier to photograph the Moon.
If your Android phone or tablet has a telephotograph lens, your best bet is to use that one instead of the open-tilt lens system to concentrate on the Moon. Use your camera's built-in camera app to line up the shutter velocity until the Moon looks properly exposed. Make sure to scale down ISO to the lowest point and if your device has aperture control, make sure to pioneer the lens aperture as wide every bit manageable.
Now if you have a telescope or a pair of binoculars that you can hold steady while pointing at the Moon, you can technically capture the Moon with any smartphone surgery a tablet. However, don't gestate the resulting figure of speech to look great – you will nearly likely see effortful amounts of chromatic aberration, as advantageously as damaging distortions. You mightiness also struggle with keeping the Moon in focus.
Lastly, keep in listen that there might be special accessories for smartphones that provide better zoom capabilities. Such accessories might comprise useful for moon photography, but don't expect them to provide impressive results…
Exposure Differences – Eccentric Study
Let's now move on to how you can proceeds a depict of the moon around together with a foreground targe – whether information technology's a tree, a house or a large rock. As explained earlier, the moon around will always look overexposed after sunset in compare to everything else.
The only way to capture the scene with the moon properly exposed, is to select two break u shots of the shot – one with the foreground in good order open and the moon overexposed and unmatched with the moon properly uncovered and the foreground objects hard underexposed. Bring up a view the following two shots:
As you can see, I changeable the above two images in two separate exposures – one with foreground properly exposed, one with the daydream. Hera is the combined shot that I did in Photoshop in just 2 minutes:
The above good example is not the unsurpassed uncomparable in terms of subject and composition, but it gets the message crosswise – you volition penury to mix two exposures to produce a only image. The toughest part is to properly mask extinct the Moon and to transparently merge the darker edges of the moon with the blue sky, which should not be a job if you know how to use the right tools within Photoshop. If the sky is equally unilluminated in both frames, then the amount of time spent in Photoshop is minimal – all you would need to execute is copy-paste the Moon and you are set!
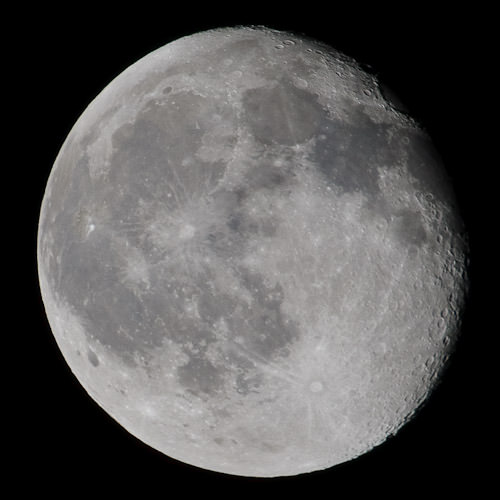
Postal service-Processing Your Moon Photos
No matter how good your project comes out of the camera, I yet recommend doing some post-processing to enhance the look of your Sun Myung Moon picture. Take a look at this photo of the Moon, straight out of the tv camera:
At once, take a look at this image that I enhanced in Photoshop:
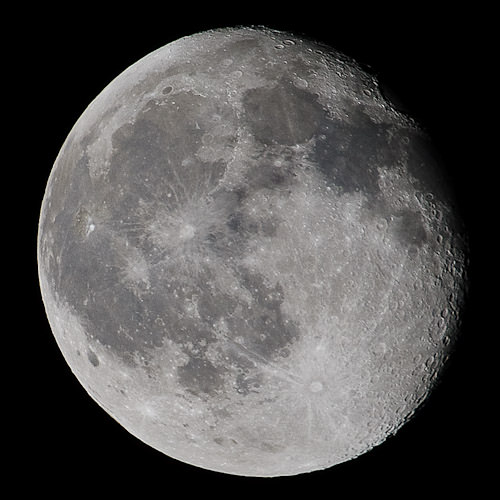
How did I do it? It was a simple, two step process:
- Image -> Fitting -> Curves and hand-picked "Moderate Contrast" Preset from the drop-down menu and clicked "OK".
- Strain -> Sharpen -> Unsharp Mask and added 150% in the "Amount" field spell keeping the "Radius" on 1.0 pixels and "Verge" on 0 levels.
Really simple and quick! If you are a Lightroom user, you can achieve great results with eventide to a lesser extent absolute clicks.
Here are many basic Lightroom adjustments I advocate:
- Start off with the right Camera Profile. I in person find "Camera Landscape painting" profile for my Nikon DSLR and mirrorless cameras to work the best for the Moon.
- Adjust White Equalise. Start with Daylight white balance and if the Moon is too orange, move the Temperature Pseudemys scripta left.
- Adjust Contrast between 10-20.
- Don't reduce Highlights too much, Oregon the features of the Moon might start to disappear and the figure of speech testament turn likewise dark. My recommendation is to stay under -15.
- The same with the Shadows – don't step-up IT to a fault often, or you volition start making the image look too unstimulating.
- To boost contrast even encourage, add betwixt +20 to +40 to the Whites slider, past betwixt -20 to -30 to Blacks.
- To increase surface level detail, bump up the Texture slider to +10 and add betwixt +5 and +10 to both Clarity and Dehaze sliders.
- Make a point to visit the Lens Department of corrections tab and check "Remove Auburn Aberration". It might also be a good idea to enable Lens Corrections.
Hither is how the Lightroom Basic tab looks for united of my Moon photos in this article:

Lastly, father't forget to add a bit of sharpening in the "Contingent" Cuban sandwich-module. I bumped up Radius to 2.0 while keeping "Detail" at 50 and "Amount" at 40. Make true to consumption Masking to only apply sharpening to the edges, so that you wear't end up with a bunch of noise in your images.
Moon on Photography FAQ
Why Photograph the Moon?
So, why would one want to photograph the Moon on? I was asked this question some times in front and my answer is simple – because we only have one Moon and it is beautiful, so why not? The Moon makes the otherwise boring night sky calculate more interesting. While photographing the Moon by itself might glucinium somewhat boring, including the Moon as an chemical element of opus can yield great results. In addition, there are Moon phases (crescent to full) that hand out even more opportunities for respective compositions. And lastly, why not try out with something new and learn how to photograph gleaming objects at night?
Why Does the Moon Look Smaller in Pictures?
I'm sure if you have already unsuccessful to take a ikon of the Moon, you probably ran into a problem where the Moon looks tiny in comparison to what you saw while pickings the picture. Wherefore does the Sun Myung Moon get photographed so much smaller? The simple suffice is – you are belik taking a movie of the Moon with a fisheye lens. Keep in listen that your eyes are like a 50mm fixed lens and if you are taking a picture with a lens that is wider in angle of view than 50mm, the Moon will be captured in smaller size! So, if you need to capture an object like a big tree diagram or a house with the Synodic month, you will need to resist boost outside and photograph the scene at least with a 50mm to try out to friction match what you saw with your eyes. And even at 50mm, the Moon power look undersized, especially if it was near the horizon when you took a picture of it. This as wel happens because of a phenomenon called "Moon on Illusion", where the Moon appears bigger to your eyes, when in fact it is not.

Wherefore Do I See the Moon as a Albescent Blob?
If you hold taken a see of the Moon after last and IT looked in like a white disk-shaped object rather than the Moon, it is because information technology was overexposed. When you take a picture of the Moon with other objects in the scene, your camera by default will calculate the exposure based connected everything but the Moon. Have a look at the to a lower place image American Samoa an example. This happens because the Moon is too small in comparison to the objects around it and a single spot of light typically does not affect the light meter of your camera. This is not a problem during the day, because the moon's luminosity more or less matches the brightness of the sky. Thus, wherefore do our eyes see everything normally, while a digital photographic camera cannot? That's because our eyes and our brain can look a so much broader range of light. In photography damage, this is known as "dynamic range".
Which Television camera Gear is High-grade for Moon Picture taking?
You can photo the Moon with any camera. However, if you neediness to photograph a close-up of the moon, you will need to use either a telescope united with a digital television camera or a compact camera with a big-telephoto lens system, such as the Nikon P900. An interchangeable lens camera joined with a big-zoom lens is another selection, although it might be the to the lowest degree cost-effective way to photograph the Lunar month.
How Do I Take Carnassial Pictures of the Moon?
If you want to get a sharp photo of the Moon, you should first make a point to steady your setup to avoid any sort of camera shake. Next, you should use a lens aperture that yields the best sharpness for your apparatus. Ideally, you should take many photos and then plenty them in software to boil down the touch of elements in the atmosphere.
Summary of Steps to Photograph the Moon
Time needed:15 minutes.
Below are the recommended steps and settings for photographing the Synodic month:
- Use a Photographic camera with a Long Telephoto lens
The longer the genus Lens in its focal duration, the better. For best results, practice an replaceable lens camera with a lens that has a central distance of 300mm or yearner (in 35mm same).

- Set Your Camera to Manual mode
Your camera most likely will not be able-bodied properly expose for the moon, so it is best to shoot in non-automatic mode.
- Correct ISO to 100
Set your camera's ISO to its base ISO, which is typically 100.
- Set Aperture to f/11
Set your lens aperture to f/11 (supported "Looney 11 Rule").

- Put across Shutter Rush along to 1/100th
Set your camera shutter speed to 1/100th of a second. This should Be fast enough to capture the moon without adding any blur.

- Set Lens to Manual Focus and Focussing Manually
You do not want to engage your tv camera's autofocus system to try to focus on the moon. Instead, fire up your camera's survive view, zoom in as tight equally you can and focus manually. Once properly convergent, you should invalid autofocus go completely.

- Becharm the Sun Myung Moon
Take a shot and examine how it looks. Adapt the above settings as incumbent to baffle the best results.

How To Take A Picture Of The Moon With Iphone
Source: https://photographylife.com/landscapes/how-to-photograph-moon
Posted by: prindlelareltat.blogspot.com
0 Response to "How To Take A Picture Of The Moon With Iphone"
Post a Comment